Easy Chocolate Candy Cane Cake: Your Festive Holiday Dessert
The holiday season brings with it a special kind of magic—twinkling lights, cozy gatherings, and the irresistible aroma of festive baking. For many, no holiday celebration is complete without the classic pairing of rich chocolate and refreshing peppermint. Our easy chocolate candy cane cake recipe perfectly captures this festive spirit, offering a delightful dessert that’s as simple to make as it is enchanting to behold.
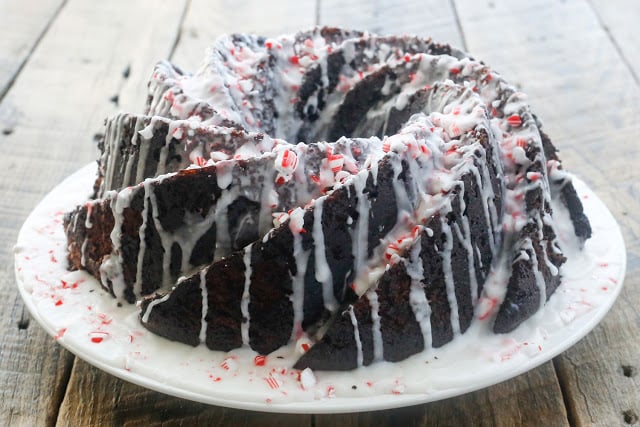
Imagine the joy of a moist, decadent chocolate cake, infused with subtle peppermint, and crowned with a fluffy, cool frosting speckled with vibrant red and white candy cane pieces. It’s more than just a cake; it’s a centerpiece, a conversation starter, and a delicious way to create lasting holiday memories. Inspired by cherished family traditions that believe something chocolate and something peppermint are essential for the holidays, this recipe brings that heartwarming nostalgia right to your kitchen.
Why This Chocolate Candy Cane Cake Will Be Your New Holiday Favorite
In the whirlwind of holiday preparations, an easy yet impressive dessert is a true lifesaver. This chocolate candy cane cake recipe ticks all the boxes, making it an instant classic for busy hosts and home bakers alike:
- Effortless Elegance: Utilizing a chocolate cake mix and instant pudding mix significantly streamlines the baking process without compromising on flavor or texture. You get a consistently moist, rich chocolate cake with minimal fuss, freeing up your time for other holiday activities.
- Irresistible Flavor Combination: The deep, comforting notes of chocolate are beautifully balanced by the crisp, cool burst of peppermint from the crushed candy canes. This iconic duo is synonymous with holiday cheer and will delight every palate. If you're looking for more ways to incorporate this classic holiday flavor, check out our Grandma's Holiday Chocolate Peppermint Cake Recipe: A Sweet Tradition for other delightful ideas.
- Stunning Visual Appeal: The vibrant red and white of the crushed candy canes against the dark chocolate cake and creamy white frosting create a show-stopping display. It looks like Christmas magic on a plate, instantly elevating your dessert table.
- Memory-Making Potential: Like many treasured family recipes, this cake has a way of becoming a tradition. The aroma alone can evoke fond memories, and the act of making and sharing it creates new ones year after year.
Mastering Your Easy Chocolate Candy Cane Cake Recipe
This recipe is designed for success, even for novice bakers. With just a few simple steps, you'll have a gorgeous, delicious cake ready to impress. Here’s how to bring this festive dessert to life:
Gather Your Ingredients:
The beauty of this recipe lies in its simplicity and readily available ingredients:
- 1 (18 ounce) package chocolate cake mix (for 2 layers)
- 1 (42 g) package instant chocolate pudding mix (4-portion size)
- 4 large eggs
- 1 cup sour cream
- 1/2 cup vegetable oil
- 1/2 cup water
- 4 semi-sweet chocolate baking squares, chopped (or 1/2 cup chocolate chips)
- 1 cup candy canes, crushed (plus extra for garnish)
- 3 cups Cool Whip (or your preferred whipped topping)
Essential Equipment:
- 2 (9-inch) round cake pans
- Electric mixer (handheld or stand mixer)
- Large mixing bowl
- Measuring cups and spoons
- Wire rack
Step-by-Step Baking Guide:
- Prepare Your Oven and Pans: Preheat your oven to a steady 350°F (175°C). Position your oven rack in the center to ensure even baking. Generously grease two 9-inch round cake pans using shortening, butter, or cooking spray. For an extra layer of non-stick insurance, lightly flour the greased pans, tapping out any excess. This prevents sticking and ensures your beautiful cake layers release cleanly.
- Combine Wet and Dry Ingredients: In your large mixing bowl, combine the chocolate cake mix, instant chocolate pudding mix, eggs, sour cream, vegetable oil, and water. The sour cream is a secret weapon here, contributing to an incredibly moist and tender crumb.
- Mix to Perfection: Using an electric mixer on low speed, beat the ingredients until they are just moistened. Crucially, avoid overmixing at this stage, as it can develop the gluten too much, leading to a tougher, less tender cake. Increase the mixer speed to medium and beat for 2 minutes until the batter is smooth and well blended.
- Fold in the Festive Flavors: Gently stir in the chopped semi-sweet chocolate and 2 tablespoons of the crushed candy canes. Reserve the remaining crushed candy canes for garnishing the finished cake. The chopped chocolate adds pockets of rich, melty goodness, while the candy canes infuse a delightful peppermint crunch.
- Bake Until Golden: Divide the batter evenly between your two prepared cake pans. Bake for 50 minutes to 1 hour, or until a wooden toothpick inserted into the center of the cakes comes out clean. Begin checking around the 50-minute mark. If the tops start to brown too quickly, loosely tent them with aluminum foil.
- Cool Completely: Allow the cakes to cool in their pans for 10 minutes. This crucial step helps the cakes firm up before you handle them. After 10 minutes, invert the cakes onto a wire rack and let them cool completely. Do not rush this step! Warm cake will melt the Cool Whip, leading to a messy frosting situation.
- Assemble and Frost: Once the cakes are entirely cool, place one layer on your chosen serving plate. Spread generously with 1 cup of Cool Whip. Carefully top with the second cake layer. Frost the entire cake, including the sides, with the remaining Cool Whip.
- Garnish and Chill: Generously sprinkle the reserved crushed candy canes over the top and sides of the cake. For the best presentation and to allow the frosting to set, refrigerate the cake for at least 30 minutes before slicing and serving.
Tips for Perfection and Festive Flair
While this chocolate candy cane cake recipe is straightforward, a few extra tips can elevate it from great to truly unforgettable:
- Elevate the Chocolate: For an even richer, deeper chocolate flavor, consider adding 1/4 cup of unsweetened cocoa powder to the cake batter along with the other dry ingredients.
- Crushing Candy Canes: The easiest way to crush candy canes is to place them in a sturdy freezer bag (like a Ziploc) and gently crush them with a rolling pin or the flat side of a meat mallet. Avoid pulverizing them too finely; some larger pieces add delightful texture.
- Peppermint Intensity: If you adore a stronger peppermint kick, you can add 1/4 to 1/2 teaspoon of peppermint extract to the cake batter, or even a tiny amount to the Cool Whip. Start with less and add more to taste.
- Frosting Alternatives: While Cool Whip provides an incredibly easy and light frosting, you could certainly opt for a homemade vanilla buttercream or cream cheese frosting for a richer experience. Just ensure it's well-chilled before applying.
- Make-Ahead Considerations: If you plan to make this cake in advance, note that the sugar-based candy cane pieces can become sticky or slightly dissolved after a day or two, especially if stored in the refrigerator. To combat this, consider garnishing the cake with crushed candy canes just before serving. Alternatively, you could swap the candy cane pieces in the cake and for garnish with Andes peppermint crunch baking bits or similar chocolate-mint pieces, which hold up better. For more detailed strategies on preparing this cake ahead of time, read our Make-Ahead Chocolate Candy Cane Cake Tips for Holiday Entertaining.
- Decorative Touches: Beyond crushed candy canes, consider adding mini chocolate curls, festive red and green sprinkles, or even a few whole mini candy canes around the base for an extra festive touch.
Conclusion
This easy chocolate candy cane cake recipe is more than just a dessert; it's a celebration of holiday traditions, delicious flavors, and effortless joy. With its moist chocolate layers, refreshing peppermint, and eye-catching presentation, it promises to be the star of your festive table. Whether you're carrying on a beloved family tradition or starting a new one, this cake offers a delightful way to share sweetness and cheer with those you love. So, gather your ingredients, preheat your oven, and prepare to create a memorable holiday treat that tastes like pure Christmas magic!
